DTF transfers have revolutionized the way we print on fabrics. We can produce colorful, high-quality prints with this technique at a reasonable price on a variety of textiles.
To master the art of aligning DTF transfers on garments or fabrics, we must first understand the printing procedures and tools. This allows us to position the transfer well and create long-lasting, beautiful prints.
Here is a detailed guide on DTF transfer placement. This will give us the knowledge and confidence to create unique textile and clothing prints. These prints will stand out because of their high quality and accuracy.
Guide to Heat Transfer Placement
This text covers the important parts of DTF transfer placement, including understanding different textiles and aligning transfers on clothes. We will explain the importance of heat and pressure in the transfer process. We will also give detailed instructions to ensure that the designs stay on the fabric.
Get The Right Terminology for DTF transfers
Understanding the terms used to describe heat transfer, size, and the position is crucial when working with DTF transfers. The important terms and concepts related to DTF heat transfers are listed below.
Heat Press Terminology
- Heat Press– It is a machine that applies pressure and heat to transfer designs from DTF films on clothing.
- Cold/Hot/Hybrid Peels- The backing film that holds the DTF film in place during the heat transfer process. After printing the design on the fabric, it is taken off.
- Adhesive Powder- The proprietary adhesion method we used on our t DTF transfers before it is cured.
- Dwell time- The duration that the garment is exposed to the heat press during the heat transfer procedure. The unique DTF transfer and fabric combination determines the specific dwell time, which is measured in seconds.
- Temperature- The degree of heat applied during the transfer process, typically indicated in Fahrenheit (°F) or Celsius (°C) degrees. For the DTF transfer to adhere well to the fabric, the ideal temperature is essential.
- Teflon Paper- It is a heat-resistant, non-stick sheet that serves as a shield between the DTF transfer and the press's heat platen. It aids in the even distribution of heat and keeps the transfer material from adhering to the platen.
- Pressure- The pressure used to press the heat press during the heat transfer procedure to guarantee that the DTF transfer adheres properly.
- Cooling Time- The amount of time the garment is allowed to cool before the carrier sheet is removed is known as the cooling time.
Size and Placement Terminology
- Canvas- The fabric surface on which the DTF transfer will be placed.
- Standard Size- The most typical size for DTF transfers is the standard size. Depending on the manufacturer and the kind of clothing being worn, this size will change.
- Maximum Size- The largest size that can be applied with a DTF transfer is called the maximum size. Depending on the heat press and the utilized garment, this size will change.
- Prints Location- The region on the garment where the DTF transfer will be applied is the print site. The chest, back, and sleeves are some typical places for this on clothing, though it is possible anywhere.
- Print placement- The precise spot on the garment where the DTF transfer is to be applied.
- Print area- The surface area of the garment that will be covered by the DTF transfer. This is important to consider when choosing the size of the transfer
Guide To Dtf Transfer Sizing and Placement
To produce an aesthetically beautiful and well finished product, DTF (Direct-to-Film) transfers must be applied to clothing or fabrics in the proper location. The following are some essential placement factors for DTF transfers by size-
Design and Style-
Consider the DTF transfer's design as well as the desired style. Multiple patterns might look better in specific areas on the garment.
Print Position-
Choose the right location on the garment where the DTF transfer will be applied. These are typical placement areas -
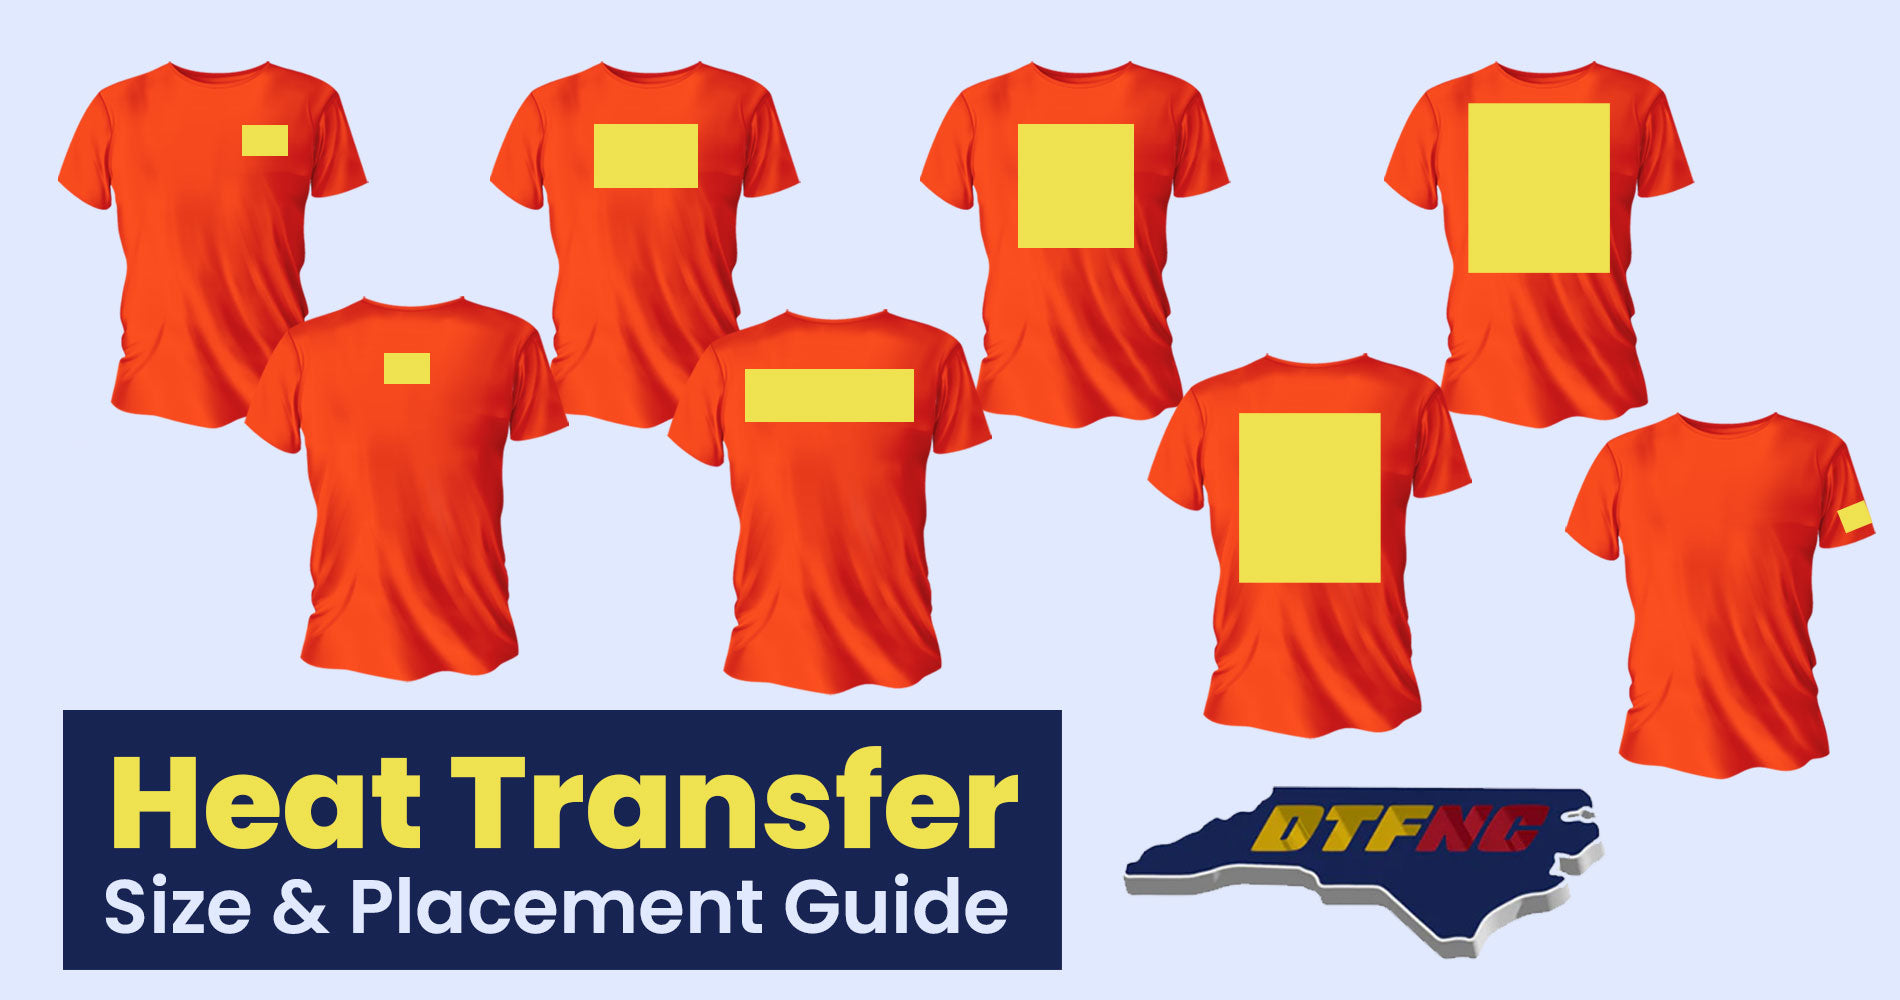
DTF Transfer Placement Guide: Center Chest
Heat transfers are most frequently placed in the center of the chest. The pattern should be positioned between the left and right seams, 2-4 inches below the collar.
The size of the transfer should range between 7"-12" width and 2"-12" height

DTF Transfer Placement Guide: Left Chest
Another typical location for heat transfers is the left chest. The design should be positioned 3-5 inches inside the center and 7-9 inches down from the left shoulder seam.
The size of the transfer should range between 2.5"-4.5" width and 2.5"-4.5" height.

DTF Transfer Placement Guide: Full Front
This position is ideal for big patterns or those that must be centered on the front of the shirt. The shirt should have the design centered both horizontally and vertically.
The range of DTF transfer should lie between 10"-12" width and 10"-14" height

DTF Transfer Placement Guide: Full Back
Designs that need to be visible from behind or that are huge are frequently placed here. The pattern should be 2-4 inches down and horizontally aligned with the back collar.
The size should range between 11"-13" width and 13"-15" height.
DTF Transfer Placement Guide: Sleeve
This position works well for tiny patterns or those that must be viewed from the side. The top arm should have the design, around 2-3 inches below the shoulder seam.
The size should be small and ranges between 1"-3.5" width and 1"-3.5" height.

DTF Transfer Placement Guide: Collar
This positioning is a distinctive method to highlight a modest design. The design needs to be positioned on the front of the collar, 1–2 inches from the top.
The size should be small and ranges between 1"-3"width and 1"-3"height.

DTF Transfer Placement Guide: Pocket Print-
A pocket-like design on the upper left or right chest area for branding or logos. The size of DTF varies as per the size of the pocket.
Alignment - Ensure that the DTF transfer is accurately aligned. To prevent uneven or off-center designs, pay close attention to horizontal and vertical alignment.
Centering - A balanced and aesthetically satisfactory effect can be achieved by centering the transfer both horizontally and vertically. For exact centering, use measurements or guidelines.
Closeness to Edges and Seams - Pay attention to how close the transfer is to edges, buttons, zippers, and other clothing accents. It is best to keep transfers away from these objects as they may impact their adhesion and endurance.
Size-to-clothing Ratio - Consider how big the DTF transfer is in comparison to the clothing. Make sure it can be placed without crowding or stretching past the edges of the location you've picked.
Orientation - Pay attention to the design's orientation, especially if it contains text or certain pictures. Choose whether the design should be vertical or horizontal, and make sure it is properly positioned on the shirt.
Use of Alignment markers - To ensure accurate placement, use alignment markers or registration points on both the transfer and the garment. This allows us to constantly match the transfer with the aid of these markings.
Mockups - To see how the layout will appear on the garment before the actual transfer, create digital or real-world mockups of it. When planning location, mockups might be extremely useful.
Overlapping - If arranging several DTF transfers side by side, think about if they should slightly overlap to produce a seamless or layered impression. Correct overlap can enhance the complete design.
Master The DTF Transfer Like a Pro with Tips and Support
Here are some extra tips for DTF transfer placement
- For uniform pressure distribution, use a heat press pillow or pad.
- Before putting the transfer on the clothing, make sure the item is wrinkled- and crease-free.
- For the right pressing temperature and time, refer to the instructions that came with the transfer.
- Remove the carrier sheet after the transfer has finished cooling fully.
- The DTF transfers will be applied accurately and appear their best if you adhere to these recommendations.
The instructions will help reveal the secrets of accurate DTF transfer placement, get ready for enhanced printing techniques and effectively leverage this cutting-edge technology. We are here to support you offering expertise, guidance, resources and top quality DTF transfer printing. Contact us!


